Tuesday, 23 October 2018

Papercraft Objects: Phase I Prototypes

So I got my first taste at digitally creating an object to be made with paper. Initially, we started off with a practice object, which was fairly manageable. Did not have too many difficulties.

Our Next task was to create an object that has a significance in our lives, so if you've read or seen all my other posts you probably already know what I was going to make. A camera.

Designing on the computer and putting it together using the paper template, for me, was two completely different levels. Prototype 1, I definitely struggled a lot! From time management to sizing the camera and just everything in between.

The first template that I made, I wasn't the biggest fan of the size as I was hoping for a smaller camera, but failed to keep that in mind when I was laying it out in rhino. The photo in red is a comparison in template sizes and the on and the photo in rhino is how the first template looked like.


I also decided to not use some of the features I added mainly due to lack of time and things were getting really intricate and messy, I now know for the next prototype to budget my time better this way I have more time to run into problems but fix them at the same time. I believe the cleanliness and precision of my camera were hurt due to my lack of time management. I made some cuts where I wish I didn't and I had to leave the feature that would have made it way better behind.

Also as this project progressed I started adopting different ways of doing things such as using the flat end of a butter knife to score the object because I was having troubles with the amount of pressure a paper clip was allowing me to do. Then I was not sure on how I was going to get the rounded side for the lens with straight edges, so I thought why not cut some tabs all throughout rather than just having one tab.

.


And this is the final result for prototype 1:


-Brandon

Monday, 15 October 2018

Paper Craft Object: Digital Samples

The idea behind this project was to get us thinking about how we would digitally design an object to be later constructed in the real world using paper. Going thru this process of manually unfolding these objects helped to add to my understanding as to the ways I choose to unfold objects, taking into consideration what would be the strongest and efficient way to unfold this object and how it would affect the physical real-life construction of it.

1. Ice cream
I wanted to start off this post with a failed unfolding. So I love ice cream which is why I wanted to do ice cream as one of my objects, I soon came to realize that you cannot use the explode function on a sphere, so ultimately this idea was a fail, but also a lesson learned.
2. Camera
Cameras are definitely a reoccurring theme when it comes to the objects I create due to its value it holds in my life, as its the tool that I will be using my whole career. 
3. B
Most of the objects I made had something to do with what was around me in my vicinity. Since I was definitely in my own vicinity, I decided to unfold the letter B, because that is the first letter of my name. 

4. Heptagon
The regular shapes that I made were all during class time, this assignment was fresh information so I didn't really have the chance to think of more outside of just regular shapes, at least for me I need the material to soak in and i need to get all the basic ideas out of the way before all the better ideas start flowing in.

5. Glasses
I wear glasses every day, so it was a no-brainer to want to do eyeglasses as one of my objects. Bryan mentioned deconstruction objects part by part for easier construction, so that is the route I went on this, I figured trying to get one all connected unfolded shape would be a difficult task, so why not make it easy.


6. iPhone
I had my phone sitting right by me so I chose to use it as one of my objects. Obviously real iPhone screens; button, speaker; front camera dont come off of the body like that but I just wanted to portray it like that so you could really see its features and there would be more to unfold.

7. Stairs
I chose to do stairs because I thought of it as a super complex cube/ rectangular prism and it would be interesting to unfold.

8. Triangular Prism
This, again, was made during class time when I was first experimenting with unfolding objects.

9. The "idk wat 2 call this" shape
I started playing around with some of the shape functions in Rhino, which I am a beginner at, and some how came up with this object.

10. Worth the Weight
I love working out so I felt like this was an easy incorporation for objects that are around me daily. I thought I would weight and leave this one until the end.


Thanks for reading!

-Brandon

Monday, 8 October 2018

Mesh Mashup: Lets Add Materials!

To make this piece feel more realistic a few materials were added. In the top two photos, the camera lens material was changed to match the camera, as making them two separate materials felt off for me. In the final, I chose a bamboo for the grip; a glossy plastic for the camera parts, and a silver for the gun itself.


- Brandon

Paper-craft Research: Hari & Deepti

I have never really heard of paper craft artists until this assignment, which is wild because there seems to be such a vast community of artists dedicated to creating art with their medium solely being paper. To me, it feels like the saying "thinking outside the box" or in this sense the paper because to me paper has always been a medium that artists create on. The artists that I have chosen, Deepti Nair and Harikrishnan Panicker, are, ironically, thinking outside the box by thinking inside it.

"Deepti Nair and Harikrishnan Panicker (known collectively as Hari & Deepti) are an artist couple who create paper cut light boxes" (https://www.thisiscolossal.com/2014/03/illuminated-cut-paper-light-boxes-by-hari-deepti/). Their purpose behind their collaborative art is to create a world of their own, transporting viewers into that world giving the feeling like they are a part of that piece. Deepti has more of a classical art style, whereas Hari describes himself as having "a more minimalist approach to design" (Hari & Deepti, 1:41), and they combined both of their worlds creating a completely new world. I feel that connecting with their audience on an interactive level, really makes the viewers experience that much more memorable and impactful. A really good example of their work that exemplifies this is the piece that they did for Pure Leaf. They were asked to show the process of how the tea is made, and they came up with this, the piece above (https://youtu.be/r9HHDju5aJc?t=1332). Hari & Deepti took a simple process and created a world and deeper story for that process. The way I see it this world is sitting in the bottle of tea, ready for drinking, as if the consumer is drinking this story.
 
From the WIP Session Talk (https://www.youtube.com/watch?v=r9HHDju5aJc) that I watched, it is made clear by the couple that their influence and inspiration comes from anything and everything in their life from places they have visited; to music that they listen to; movies that they have watched; books they have read; everything. A quote that they both resonate with by Newton is "if I have seen further than others it is by standing upon the shoulders of giants" the message they take away from that in regards to their work, is that everything that they do in their art has already been in existence, they are utilizing everything that they know into creating these smaller worlds out of paper. The photo above is Hari & Deepti's interpretation of a photo they took at a lava field in Iceland. In the video, Hari said they that everywhere they would go they "started seeing everything in layers because they work with layers of paper" as if they were able to deconstruct the real world in order to make the layers of their created world. 

I believe that many artists strive to bring their viewers into their world, a world that they have created, sometimes a visual representation of what is going on in their mind. I know for me as a photographer that is my goal. I strive to take my audience on a journey through a viewing path filled layers and personality; giving them the sense that they know the story or message of what is shot, while also allowing their mind to wander with their own interpretations, creating an even longer-lasting connection, solidifying my art within them. I want them to feel like they are the ones that captured the picture, or feel like they are in the photo themselves, putting them into my shoes and feeling what I feel. Connections like these really allow your audience to get to know you on a personal level without having to even talk face to face, kind of a visual language. This also seems to be the mindset that Hari & Deepti give off; the connection with each other thru this visual language and in turn, connect with their audience with their collaboration of ideas. 

They inspire me because of the depth of their work, both physically and through their actual message. The lightboxes that they create have literal depth, emphasizing the point of being its own world; as well as giving depth thru the messages or feeling they are trying to envoke. This really inspires me because it shows how much work and thought goes into every single piece. Another thing that I really love is that since they are papercraft artists, they mould and craft all these pieces, creating all of these worlds with their hands, it's a very hands-on process which is something that I really admire.  In photography I love artist that actually put meaning and thought behind their photos, there are a bunch of people who shoot photos just to shoot them with no deeper message or feelings behind the piece, more so just "it looked cool so I took a picture and slapped an edit on it", I don't resonate as well with work like that. I like getting to dig and take apart the piece seeing how it all came into being, the thoughts, feelings, messages that are being said thru this frozen moment in time. Hari & Deepti definitely put this vast amount of thought into their work, and it can be seen through their finished work. Even before doing research about them, basing off of the work that I saw, I could already tell that they had the depth to their work.


- Brandon

Tuesday, 2 October 2018

Mesh Mash Up: Refinement and Feedback

Original:

Refined Object:

The p2p feedback was one of the reasons I decided to go forward with this design, saying that out of the 10 objects this was the most powerful. It was between this object and my camera fish tank, but one of the comments I got was that due to the inspiration behind the fish tank (see the previous post), people might not really relate to it or understand it right away. Whereas with this design it is more relatable and more meaningful in the sense of me playing with the word "shoot" and combining two different meanings into one. The idea behind this was not to make a gun that shoots pictures, but more so a display piece.

I kind of wish I asked "how can I improve upon this design?" as the refinements I made were more so to make the object feel more realistic and detailed. I added the brown grip to the handle; made the lens transparent and added focal rings; as well as including a screen on the displays of the camera.

I believe that my creation relates to remix culture because it is a mashup of two completely different objects and moulding them in a way that creates a new meaning and use for them. The meaning and purpose of the two objects were completely separate, and the individuals who create them did not make them with the intention of the two combining their objects together. The juxtaposition between shooting is merged together when these objects are combined. My message that I am trying to display is saying how cameras can be as powerful as guns, in the sense that pictures can make or break people and cause individuals to feel all types of emotions and feelings.

To me that is all a part of remixing and mashing up, taking inspiration and ideas from others and then putting our own twist on things. It's pretty difficult to say you have come up with a completely new idea because most of the times we are influenced by everything around us, whether we are consciously aware of it or not.


- Brandon


Tuesday, 25 September 2018

Thingiverse Mesh Mashup

1. Camera Gun
          The inspiration behind this is because when you take photos they are known as shots, but also when a gun is fired it is also known as shots. Just playing with the different meanings behind the same word. Also, it is said that cameras are as powerful as guns.

2. Think Tank (name inspo by Bryan Cera lol)
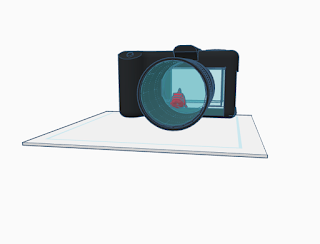
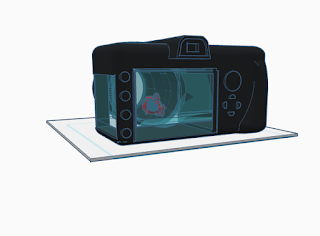
          The inspiration behind this tank is because of my love for photography and I recently got a beta fish, so I thought why not put the two together. So I found a model of a camera and a fish tank and put them meshed the two.
3. Man, a Dog's best friend
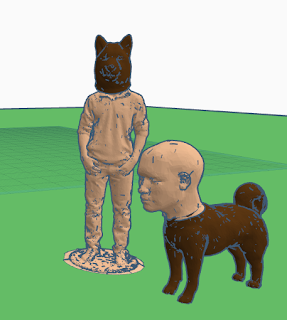
        The inspiration behind this piece was just messing with the saying "dog, a man's best friend", just changing the roles around by putting the dog head on the person and the person's head on the dog body.


4. Yoshi Planter
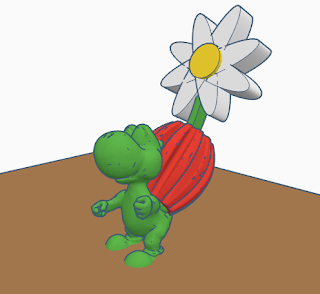
           Inspo behind this one is I asked my girlfriend of ideas to make and she said "make me a cute planter", so I found a cool looking vase and on the front page of the "newest things" Yoshi was there so I used him, replacing the little red thing on his back with the vase.

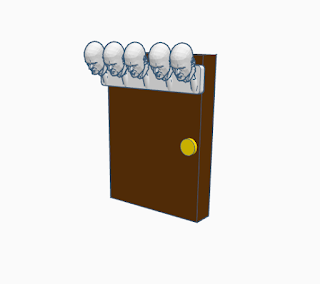
5. Hat Holder
          The inspiration behind this one was seeing all the funny ring holders that used actual hands, on Thingiverse. So I went along those lines and found a coat hanger and put heads on it and made a hat holder.
 

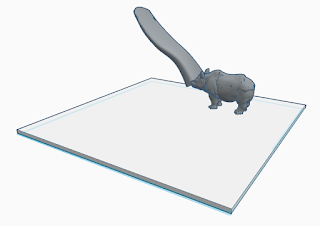
6. Rhino Shoe Horn
          So many people make fun of shoehorns, but they are literally such an amazing creation, so I figured why not put a shoe horn on an animal that has a horn, as their horn.


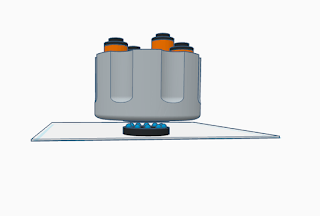
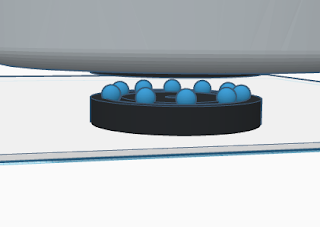
7. Revolving Film Canister
             A lot of my ideas went back to photography, so I drew inspo from there. this time using a pencil revolver holder but changing its purpose and size to make a film canister holder. I added a lazy susan on the bottom so that the canister could spin, mimicking a revolver.
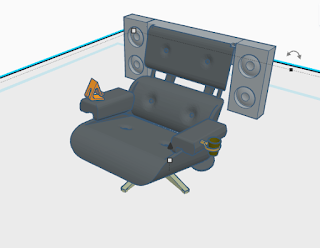
8. Essentials Chair
         Not going to lie for this one I was having a hard time thinking of something, and as I sat there I thought about all the things my desk chair did not have (speakers, phone holder, cup holder) and mashed them altogther.

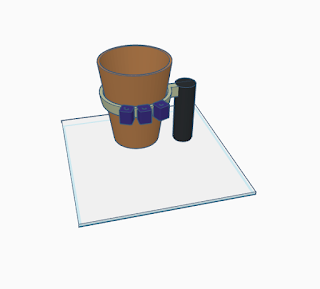
9. Creative's Mug Holder
        Inpso going into this one was for my drawing class I had to carry so much with me because my sketch book is 18''x24'', so I thought how can I make this so I can carry less stuff, then I combined some pencil holders with a mug holder and created a handle.


10. Camera Gear Holder
           Inspo behind this one was having an organization system that could hold all my gear. For the lens/camera holder I used this bullet shell holder that I stumbled across, and since the shape was perfect for lenses that was the first thing that came to mind. I also attached a memory card/usb holder and a go-pro holder.


Some of the things made seem pretty basic but this process of creating 10 concepts reminded me of my design drawing class, where we had to make 10 thumbnails of ideas we had in order to sift our way to the more creative and unique ones. 

(The objects above are not listed in order of when they were made.)


The camera fishbowl was picked as honorable mention for Bryan Cera's Object Design class -Brandon Barcena


Hyperlinks:
person: https://www.thingiverse.com/thing:758728

dog head: https://www.thingiverse.com/thing:1217422

gun:https://www.thingiverse.com/thing:298188

yoshi:https://www.thingiverse.com/thing:927715/files

vase: https://www.thingiverse.com/thing:3117371

headphones: https://www.thingiverse.com/thing:512987/files

chair: https://www.thingiverse.com/thing:208296/files

boom box: https://www.thingiverse.com/thing:15245/files

phone stand: https://www.thingiverse.com/thing:2120591

Laptop stand: https://www.thingiverse.com/thing:810295

cup holder: https://www.thingiverse.com/thing:2271973/files

Fish tank: https://www.thingiverse.com/thing:23286

Fish: https://www.thingiverse.com/thing:654888/files

coat hanger: https://www.thingiverse.com/thing:2896129/files

head: https://www.thingiverse.com/thing:455885/files

sd card holder: https://www.thingiverse.com/thing:931121

shell holder: https://www.thingiverse.com/thing:3119580

go pro holder: https://www.thingiverse.com/thing:32548/files

rhino: https://www.thingiverse.com/thing:182261/files

Shoe horn: https://www.thingiverse.com/thing:2146775/files

Pencil Holder: https://www.thingiverse.com/thing:1623114/files

lazy susan: https://www.thingiverse.com/thing:1953369

revolver holder: https://www.thingiverse.com/thing:1459657/files

Final assignment: Ceramic 3D Print

So we have now reached our very FINAL project, and for this one, we will be working with ceramic 3D printing. With our first groups, we were...