So we have now reached our very FINAL project, and for this one, we will be working with ceramic 3D printing. With our first groups, we were required to join forces with another group to create a big team. Jeruel and I were partnered up with Elise and Dorothy.
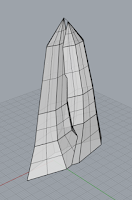
We started by drawing out some concepts separately and then we discussed them, here are the concepts that were made:
From there Dorothy and Elise took the driver's seat, with their expertise with 3D Design, and worked their magic. Ensuring the design was what all of us wanted, they were always making sure to ask us if the design was representing Jeruel and I's design at the same time representing theirs.
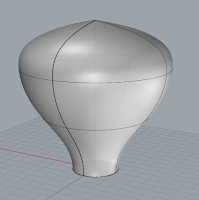
And this was the final rendering:
A week after this whole process, we took everything to the ceramics department to have our final piece 3D printed.
An afterthought that our group had was that we probably could have pushed our design way further, due to the clay that was being used it did not flush out the details as well as we would have hoped.
And that is it for this semester's Object Design class
Brandon signing off!
@portraitsbybrandon
(^Photography Instagram^)
Wednesday, 12 December 2018
Tuesday, 27 November 2018
3D Printed Object: Hybrid Design + FDM Print
Welcome to our final project in Object Design 110!
For this project Bryan wanted to try something different form our past projects that we have been doing, as this one is a collaborative/ partner project. Groups were randomly generated and I was paired with Jeruel, seems not that random since we sit beside each other hahaha, but I'm not complaining.
We decided to pick our 5 favorite designs that we personally illustrated from each of our concepts and from there we were going to make combine and create a new collaborated object in some way.
The 10 concepts that I came up with on the last iteration were:
You can see that in my previous post.
The concepts that Jeruel came up with were:
You can also find that in his previous post.
So from here we decided to create our drawings independently so that we could come up with completely separate ideas to give us more to work with.
Ultimately, we decided to go with Jeruel's design, which combined my hourglass-like object and his lofted circle object.
The final design Jeruel took the reigns as he has a better skill set when it comes to 3D design, and it came out pretty much exactly how it was illustrated.
So now we moved onto the final part of this project, printing!
We first began by doing a smaller scaled test print to ensure that hours of effort didn't go to waste if the design were to fail.
We now felt ready for our FINAL final step, which was printing the actual final piece and of course this is were we started to run into some problems. Everything started off fine, the print itself was just super "big" that it was taking a while to make progress on the print.
After about 3 hours of printing, and our object only 20-25% complete, the printer started wigging out and was no longer printing in line with the design and was just going everywhere.
After emailing back and forth with Bryan, he came to the conclusion that this was caused by a faulty bearing on the x-axis. We decided to rescale our object, to an appropriate size, so that it would not take as much time to print and printed on a different printer.
And this was the final outcome...
- Brandon
For this project Bryan wanted to try something different form our past projects that we have been doing, as this one is a collaborative/ partner project. Groups were randomly generated and I was paired with Jeruel, seems not that random since we sit beside each other hahaha, but I'm not complaining.
We decided to pick our 5 favorite designs that we personally illustrated from each of our concepts and from there we were going to make combine and create a new collaborated object in some way.
The 10 concepts that I came up with on the last iteration were:
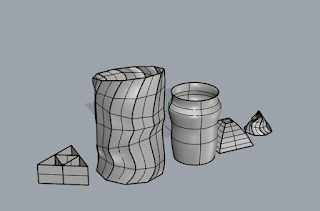
You can see that in my previous post.
The concepts that Jeruel came up with were:
You can also find that in his previous post.
So from here we decided to create our drawings independently so that we could come up with completely separate ideas to give us more to work with.
Ultimately, we decided to go with Jeruel's design, which combined my hourglass-like object and his lofted circle object.
The final design Jeruel took the reigns as he has a better skill set when it comes to 3D design, and it came out pretty much exactly how it was illustrated.
So now we moved onto the final part of this project, printing!
We first began by doing a smaller scaled test print to ensure that hours of effort didn't go to waste if the design were to fail.
After about 3 hours of printing, and our object only 20-25% complete, the printer started wigging out and was no longer printing in line with the design and was just going everywhere.
After emailing back and forth with Bryan, he came to the conclusion that this was caused by a faulty bearing on the x-axis. We decided to rescale our object, to an appropriate size, so that it would not take as much time to print and printed on a different printer.
And this was the final outcome...
- Brandon
Tuesday, 13 November 2018
3D Printed Hollow Form Object: Concept Generation
Concept generation:
I feel that my creativity is very limited due to my lack of knowledge in 3D design outside of what I have learned in class, so some of my ideas are just chained after ideas I have made. Definitely, for me, it is one of those things that I just have to keep playing around with to discover the endless possibilities that 3D Design offers
Using the polygon tool, I sequentially went down in the number of sides each time I went up a level.
2. "Lamp shade"
3. "Coffee"
4. Octagon
5. Triforce (zelda)
6. Not-so-failed attempt?
7. Rice hat? LOL
I made this form and then realized it kinda looks like a rice hat
8. Hour glass
9. Stacks
10. Octagon Loft
Tuesday, 6 November 2018
Papercraft Objects: Final Revision
(Left) This is the first template I made for my object, which upon construction, I discovered was a difficult task. It was difficult because of the way I chose to design my template; putting holes where they were not needed, which created problems with the glueing; the size of my tabs, which frustrated me because the glue would not hold to the little surface area I made for the tabs; and just the size of the camera, in general, was complicated to work with. So taking everything I learned, process-wise, I improved all the details that were not working for me.
During peer critiques, the main comment that kept coming up, which was also something that I criticized myself for, was that my object was too plain. Even before bringing it to class the more I looked at it the more my object just seemed like a rectangular prism connected to a cylinder, with barely and distinguishing features. So for the last revision, I shifted my main focus to adding details. During crit, everyone was able to tell it was a camera but they all suggested putting in more detail and levels to make the object pop more.
The templates below are from my final revision of my papercraft object. I decided to take inspiration from a specific camera, that being the Contax T2. The reason I choose this film point and shoot camera specifically is that I shot with it during my trip to New York this past summer, and it has such square body I figured it would be easy to work with for this project. Also by choosing a specific camera, it allowed me to know what kind of details I wanted to add to my object.
I also really wanted to do a film camera so that I could make a film roll and display it inside the camera, just like all point and shoots do (which is my favourite part of my object). Along with the film roll, I also added dials, exposure display count, a flash, and a textured grip/handle.
I was having trouble wrapping the film roll since it was hollowed so I stuffed it with tissues so that I could use a bit more pressure to get the glue to hold.
And this was the finished product!
- Brandon
Subscribe to:
Posts (Atom)
Final assignment: Ceramic 3D Print
So we have now reached our very FINAL project, and for this one, we will be working with ceramic 3D printing. With our first groups, we were...